LHS Photo Club Web Page
05/04/07 Multi Layer Composite
Most of you really enjoyed copying and multiplying elements with the rubber stamp tool. Now we are going to do something even more fun. We are going to create a composite by combining elements from multiple images. It is very easy to get professional looking results if you follow some inital guidelines outllined in Part I.
Part I. Carefully take the necessary photos.
For our initial introduction
to this topic we are going to try and control our input photos so that the
compositing
process in Photoshop is as easy as possible.
a) Use a Tripod. We want all the photos to be taken from exactly the same
view point so that they line up precisely when we combine them. Even with
a tripod you have to be careful not to push the shutter button too hard causing
the camera to move between images. A cable release is ideal.
b) Control Depth of Field, Focus, and Exposure. Keep the
aperature constant between images by using your camera's AV or Manual Mode.
Also to help keep
the focus
constant consider a small aperature to create a large depth of field or a
subject that stays about the same distance from the camera. Finally do your
best to keep the exposure consistant between images.
Part II. Open all the images in Photoshop
Copy the images below to your desktop then open them in Photoshop.
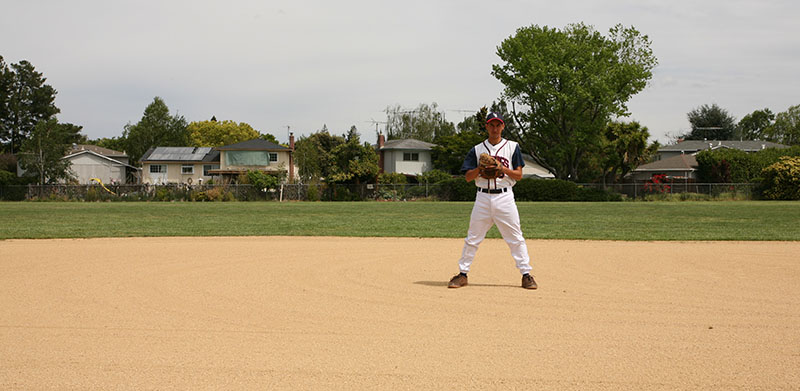
Primary Image . . . . ..Left
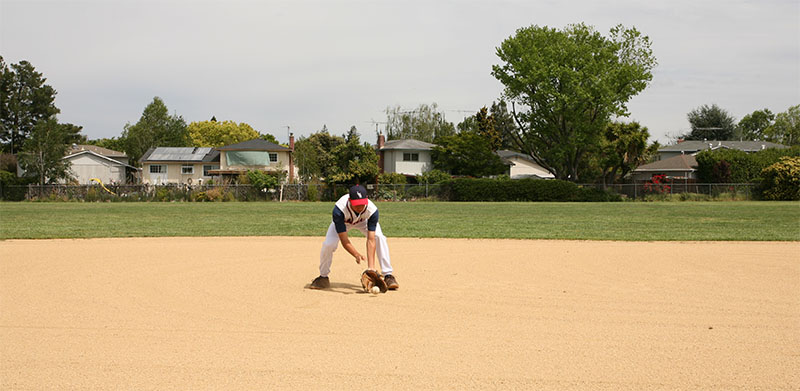
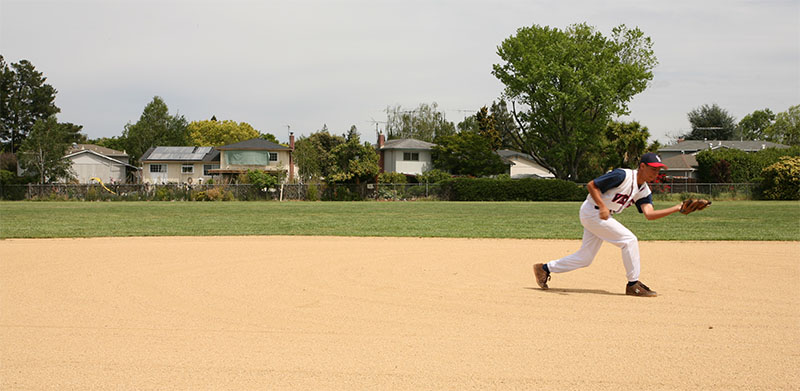
Secondary . . . . . Right Secondary . .
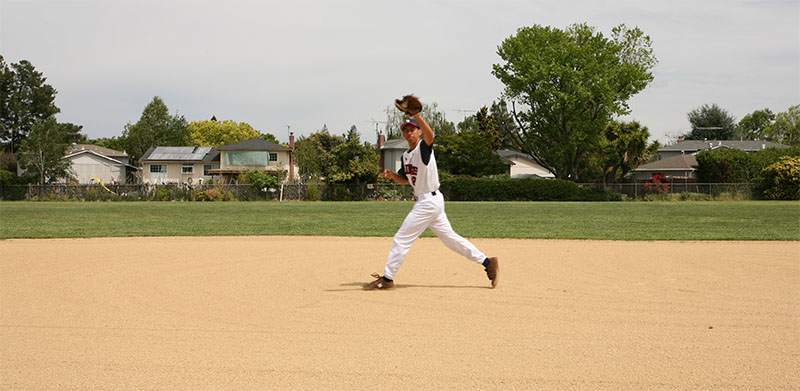
.. . . Overlap Secondary
File>Open, select them all, Open.
Decide on one image to be the primary file.
File>Save As> give it a new name such as composite and choose
Photoshop as the file type.
Click in one of the secondary files to activate it. Now from the layers palette
Shift+Click+Drag the image layer and drop it on/in
the primary file. Holding
Shift centers the image when it is added to the other file. This ensures
that the images line up exactly since we used a tripod and didn’t change
things between images. If you didn’t use a tripod you will most likely
have to rotate each new layer to get it to match up (changing the blending
mode to difference can help as we did when assembling panoramas). Worse yet
you can end up with difficult parallax errors.
Double Click the word Layer in
the Layers palette are give it a more descriptive name.
Repeat for each of the secondary files.
Now you should have one image with individual layers representing each of
the secondary files. In the Layers Palette, make sure
that all the eyeballs are turned off except for the Background layer.
Click the title of one of the layers containing a secondary
image. It’s
eyeball should turn on and it should become bold and highlighted in the list
of layers.
At the bottom of the layers palette, Click the box
with a circle in side to add a layer mask.
Now we are going to erase the part of the image we want to add to the composite.
In this case it is Elliot fielding the baseball and any associated shadows.
Just follow the steps below:
B for brush and use the [ ] keys to increase
or decrease the size. With the brush activated right click on the image to
bring up the brush selection
box. Make sure that hardness is set to 0 (initially we want to blend our
selections with the original image).
Check the toolbar to make sure the color is set to
black (remember that x
toggles between foreground and back ground colors, usually black and white).
Also check to see that the brush opacity is set to
100%. The brush opacity
is easily changed in increments of 10% by selecting the numbers 1-0 with
the brush active. 0 causes the opacity to = 100%.
Now paint with black to erase the portion of this particular secondary image that you want to add to the composite.
Remember that white reveals while black conceals. Now we want to reveal the portion of the image that we erased. We need to change the black parts of your new mask to white and the white parts to black.
Ctrl+i to invert the layer mask. Presto, we have just cloned Elliot. Note that this worked very easily because the input guidelines from Part I were followed when the initial images were taken. Not following the original image guidelines will result in having to make much more complicated masks as well as other modifications to correct exposure or color balance.
Repeat this process for all remaining layers representing secondary files.
Now you have multiple Elliots fielding the ball. As you can see some of the clones are “cleaner” than others. In particular, the ones that overlap may be missing parts. It is time to clean things up.
When you look at a Photoshop image you are viewing it from the top layer down to the background layer. You may need to move a layer up in the stack in order to move that particular clone in front of another.
You will also need to fine-tune the individual layer masks to get the overlap correct. In the Layers Palette, click on the layer mask icon that you want to modify. Zoom in and paint more precisely with black (to conceal) and white (to reveal).
Now refer to the Quick Edit instructions to finish working up your composite.
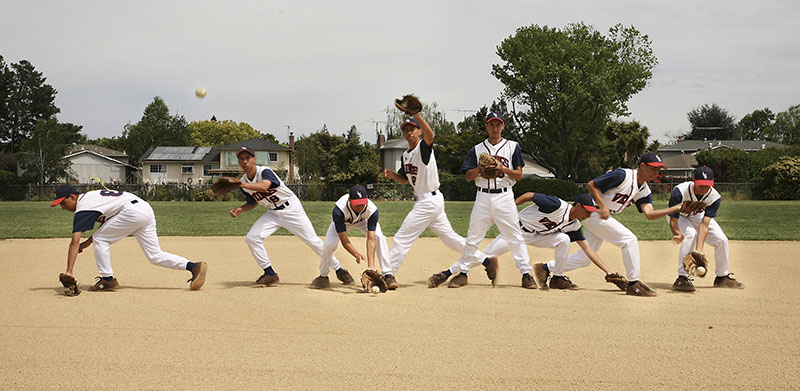
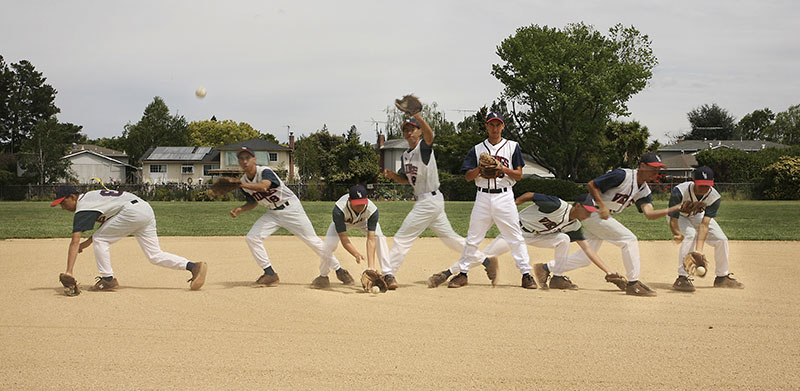
Here are two of my versions of the completed composite:
The first has all the layers at 100% opacity.
The second has all the secondary images
at 75% to accentuate the primary
image.
Be creative and come up with your own multi layer composite. Consider using
the self timer so that you can be the
subject.